Posts Tagged ‘microstock’

Come across picWorkflow recently, and I am quite impressed that it actually works smoothly as it is claimed. The images are able to upload to every websites in just a few clicks without problems.

click to register, and the support is good, and you will get free credits for helping out something.

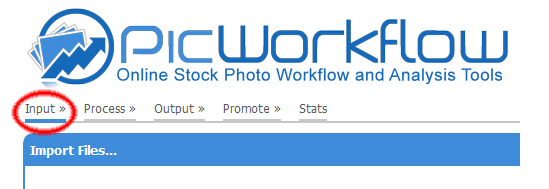
Steps 1. click the ‘Input’ page

First to select ‘Input’ page, page that will show you files that you had uploaded.
null

Steps 2. To upload your files

To upload your images through 2 options, ftp, Java applets or lightroom plugin! For vector option, upload matching name of eps and jpg preview, IPTC in jpg preview will be read.
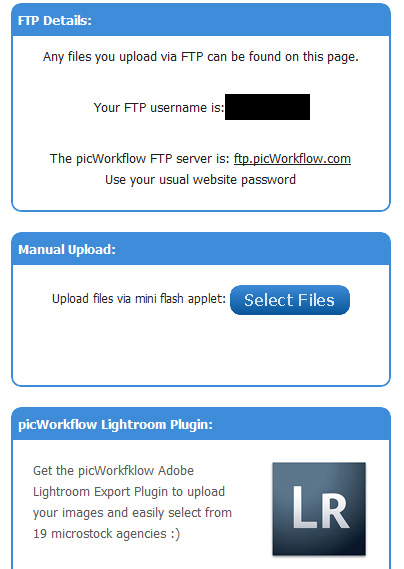
look for ftp program like filezilla or just simply use the java upload.

after finished uploading, click the ‘Import’ button!

Step 3. To add keywords, skip if IPTC had been tagged in jpg

click for ‘process’ after successfully ‘imported’.
It is advisable that you had use Photoshop or some tool that write IPTC data such as descriptions and keywords to your jpg, it will cut short the time for workflow, and it is always good to tag your IPTC directly to your JPG so you won’t end up with a files without keywords.

If you had tagged your IPTC data with JPG, you can simple go to next step.

Step 4. To set up login information for websites

Click ‘output’ page. Firstly, you need to set up for all your accounts login information, look for ‘manage credentials’

You will be directed to a page that all websites that are available, and you can add your own websites that support ftp.

Edit with your username and passwords for ftp of every websites, you need to key in a ‘Master Password’ for any changes of this page. Just key in a password and remember it, since you need to use it all the time.

Step 5. To submit

After it is done, go back to the ‘output’ page. To upload, just click the yellow buttons under the websites you want to submit.

If your file is haven’t uploaded, the buttons will be appeared as an yellow button, click on the buttons and it will show as orange as pending upload, after it turns green, it means the file is uploaded in the sites successfully.

button status:

you need to key in your ‘Master Password’ to authorize the uploading.

That’s all, once all the light turns green, you just need to go those websites for a final check, and choose categories if necessary and done.

Register here picworkflow. It will make your images to be available for sales at every websites in shorter time.

With the weakness of US currency and Tax on US sales for some countries, one may need to take note the difference among all agencies. The mentioned Tax is taxed on US sales for countries with non-treaty to US. Check this link for country that had treaty with US, here.

Agencies that Paid in US$ and Tax for US sales:

Shutterstock: US$-Moneybookers/Paypal (Tax-yes)
Dreamstime: US$-Moneybookers/Paypal (Tax-yes)
Bigstock: US$-Moneybookers/Paypal (Tax-yes)
Veer: US$-Paypal (Tax-yes)
fotolia: US$/EURO/UK Pounds-Moneybookers/Paypal (Tax – yes), If you want to get paid in EURO or UK Pounds, please remember to register through a EUROPEAN or UK fotolia website, however it seems sometimes the website will direct you to US based webpage, so just watch out.

Agencies that Paid in US$ not holding tax for US sales:

istock: US$-Moneybookers/Paypal (Tax-No)
123rf.com: US$-Moneybookers/Paypal (Tax-No)
Graphicleftovers.com: US$-Moneybookers/Paypal (Tax-No)
Canstock: US$-Moneybookers/Paypal (Tax-No)
Depositphotos: US$-Moneybookers/Paypal (Tax-No)
Crestock: US$-Paypal (Tax-No)
Cutcaster: US$-Moneybookers/Paypal (Tax-No)

Agencies that Paid in EURO and not holding tax for US sales:

Zoonar: EURO – Paypal (Tax-No)
Yaymicro.com: EURO – Paypal (Tax-No)
Panthermedia: EURO – Paypal (Tax-No)

One more thing you can get paid more is by using Moneybookers(1.99%), It has a better exchange rate than Paypal(2.5%). However, Moneybookers can only keep one currency, instead of like Paypal keeping multiple currencies. Remember to choose a location that your bank is located when registered to Moneybookers.

I end up using Moneybookers for all US based agencies, and keep the paypal for some EURO payment.

check out both:


Sign up for PayPal and start accepting credit card payments instantly.

Yaymicro is located in Oslo, Norway. As a young stock agency, it is growing and getting more attentions from sellers and buyers.

yaymicro is starting an affliate program. You can earn by telling people about this website! click the link below to registered and get the free image and discounts!

you’ll get 1 credit added to your account, that allowing you to download 1 free image, in web-size. You’ll also get a 20% discount on your first purchase, no matter what or when you buy!

click here to check out the website to get the free image and browse through those images and illustrations.

click here for yaymicro

Halloween cartoons!

There are some nice illustrations for your coming halloween, available at graphicleftovers, you can buy it with affordable price, eps vector format and high resolution jpeg. Here are a few I like:

Royalty-Free Vectors and Images

Royalty-Free Vectors and Images

Royalty-Free Vectors and Images

Royalty-Free Vectors and Images

Royalty-Free Vectors and Images

Royalty-Free Vectors and Images

Veermarketplace of veer.com is having this promotion to pay back photographers and illustrators with cash. Once your images or illustrations are accepted, each will get paid, details is here. http://www.veer.com/ideas/dashforcash/

if you want to be a contributor, check here contributor.veer.com

Just to share something about microstock, I guess some of you are contributing it so but if you haven’t heard about it you may try it out.

basically it is selling images through all these website, each image will be sold at a range of price depends on how it is used, for website or for publications. Anyway, i think it is proved that it works and one can generate some incomes by uploading your pictures there. However, i think only these few websites works, especially for beginners.

Basically image requirements are 6MP image, 3000×2000 or above, JPG. If you intend to submit it, try taken with low ISO with less noise. If there it is a studio shoot, you need to upload model release for people, and property release for items. no commercial logo or patent design in images, use photoshop to remove sign or logo if possible. For travel or outdoor shoots with recognised face, if you don’t have model release it is possible to upload as editorial usage for some website.

All website accepts illustration too, like vectors and JPG image done by photoshop or other application. There are some requirements for vectors, let me know if you are an illustrators. I can tell you more.

It takes some time to upload and put keywords for it but i you can try it out it may be something that works for you.

By the way, put the title, description and keywords through photoshop, and it will be embedded into jpg, and most website can read it when you upload, it saves time!

Just try out the first 4 website by sequences.. there are tons of website but i don’t think there are enough buyers in those website. It just ends up wasting time.

1. Dreamstime
This is a website with good traffic and easy for beginner, you can just start to upload your images once register. Good website layout and it can really sell.

2. Shutterstock

For shutterstock, there are 2 website, shutterstock.com is for buyer, submit.shutterstock.com is for contributors.

This is number 1 website in earning for most microstock contributors, however you need to submit 10 images for approval, once you are accepted you are allowed to upload. It is really successful since the sales is almost everyday.

3. Istockphoto

This is first microstock website and is quite successful for some contributors. It requires 3 images for qualitification test too. Once approved you can upload too. But it seems more strict and rejects simple or too common images.

4. Fotolia

This is also one of the BIG 4 website, but it is very strict about images quality, and none of my negative scanned images are accepted. However, i do see some sales in this website too.

the next two can be considered if you have done with the above 4.

5. 123rf
I only have little sales on this website, part of the reason is a small porfolio, but still got sales.

6. bigstockphoto
It is also one of the website that can generate some sales for most contributors.

you can earn some $ by contributing to microstock website..here is my quick summary.

1. Shutterstock, it is the site that most people should start with.  It seems many traffic and sales are much higher comparing to other website. It may sell at $0.25 if buyer using subscription, however the sales number are much higher comparing to other website.

2. Dreamstime, just register and you can start uploading without ‘passing an review of your photos’. Do see some sales and the website is alive and continuously improving.

3. Istockphoto, do see some sales too, but the requirement of images and illustration to be accepted is getting strict. The uploading method is a bit troublesome.

4. Fotolia is also worth to upload, the traffic is there so there are sales. However, the interface is not that user friendly. If your uploads are rejected, you will just received a message in email and your fotolia account (click ‘contact support’) that telling your the image id that got rejected. You have to match the id number in order to know the reason of rejection.

123RF, bigstockphoto, canstockphoto.. veer.com, cutcaster..blah blah..the sales are zero or too low for me to spend time.

There is a newcomer, depositphotos.com, it attracts contributors by offering $0.20 for every accepted image. Remember to read the instruction since you need to ‘activate’ this promotion. I am still pending for the application at this moment, will update how is it.

If you are just starting in this microstock, just go for this 4 websites. It won’t be wrong. You can click the banner link at the side to register.

Remember to scan a passport or ID for registration, you need to upload them as identification.

Leave me message if you have any questions.

Always remember to save everything in ai format first before save as eps. There are few reasons.. first it may cause ‘expanding’ when you save as lower version of files, that’s mean illustration divide into pieces that is hard to group it back.

second is more like a careless mistake, you had done a lot of changes in your illustration and you directly save as eps and forgot it hasn’t been saved as original ai file. Then you go on trim everything, remove everything for final image, and save at the final stage for eps. It sounds okay, but you had lost some raw illustration that you may still need.

hope it is helpful.